Objective
Show the best practice to update the OpMon on a cluster environment.
Target Audience
OpMon admins who needs to realize the update procedure on OpMon Cluster.
Please, see changelogs for more details.
Prerequisites
- We are making the update like the following documentation.
- It’s necessary to have a user with the opmonadmin permission and root access.
- Before we start the major version update, it’s necessary make the minor version update.
- It’s necessary that the OpMon have access to the following address: http://repo.opservices.com.br
- Always see the update issues related to the update version. Click here to consult the version changelogs.
- Make the opcfg backup. To make that, follow these commands:
[root@opmon]# /usr/local/opmon/utils/opmon-base.pl -e opcfg
- Move the backup using the following command:
[root@opmon]# mv /var/tmp/opmondb/opcfg/ /var/tmp/
1 – Precautions before update
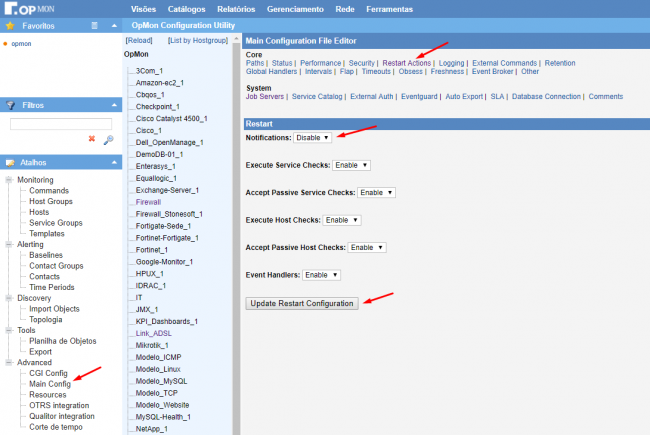
- To avoid false positives notifications, deactivate them globally accessing the menu “Tools/Configuration“. Choose the Main Config/Restart Actions options and check the notifications as disabled. Click on Update and after that in Apply on Export Menu.

- Use the crm_mon command to verify how is the enviroment configuration, in this case, we have a VIP (Virtual IP) in each node and all OpMon proccess running in Node01:
Stack: cman
Current DC: opservices-opmon-nodo02-pae (version 1.1.15-5.el6-e174ec8) - partition with quorum

Last updated: Tue Jun 27 12:02:43 2017 Last change: Tue Jun 27 12:02:40 2017 by root
via crm_resource on opservices-opmon-nodo01-pae

2 nodes and 17 resources configured

Online: [ opservices-opmon-nodo01-pae opservices-opmon-nodo02-pae ]

Active resources:

vip_nodo01 (ocf::heartbeat:IPaddr2): Started opservices-opmon-nodo01-pae
vip_nodo02 (ocf::heartbeat:IPaddr2): Started opservices-opmon-nodo02-pae
 Resource Group: opmonprocesses
 syncfiles (lsb:syncfiles): Started opservices-opmon-nodo01-pae
 opmon (lsb:opmon): Started opservices-opmon-nodo01-pae
 optraffic-pri (lsb:optrafficd): Started opservices-opmon-nodo01-pae
 Clone Set: OpmonExtraProcesses_Clone [OpmonExtraProcesses]
 Started: [ opservices-opmon-nodo01-pae opservices-opmon-nodo02-pae ]
- Before start the update proccess, it’s necessary stop the pacemaker process, responsible for the cluster process, on Node02:
[root@opmon-nodo02 ~]# /etc/init.d/pacemaker stop
 Waiting for shutdown of managed resources...... [ OK ]
 Signaling Pacemaker Cluster Manager to terminate [ OK ]
 Waiting for cluster services to unload.... [ OK ]
 Stopping cluster:
 Leaving fence domain... [ OK ]
 Stopping gfs_controld... [ OK ]
 Stopping dlm_controld... [ OK ]
 Stopping fenced... [ OK ]
 Stopping cman... [ OK ]
 Waiting for corosync to shutdown: [ OK ]
 Unloading kernel modules... [ OK ]
 Unmounting configfs... [ OK ]
- Then, veriffy the cluster enviroment through the crm_mon command and observes that all process are running on Node01 and the Node02 is offline:
Stack: cman
Current DC: opservices-opmon-nodo01-pae (version 1.1.15-5.el6-e174ec8) - partition WITHOUT quorum
Last updated: Wed Jan 17 17:26:32 2018 Last change: Thu Jan 11 10:26:29 2018 by root via cibadmin on opservices-opmon-nodo01-pae

2 nodes and 15 resources configured

Online: [ opservices-opmon-nodo01-pae ]
OFFLINE: [ opservices-opmon-nodo02-pae ]

Active resources:

vip_nodo01 (ocf::heartbeat:IPaddr2): Started opservices-opmon-nodo01-pae
vip_nodo02 (ocf::heartbeat:IPaddr2): Started opservices-opmon-nodo01-pae
 Resource Group: opmonprocesses
 syncfiles (lsb:syncfiles): Started opservices-opmon-nodo01-pae
 gearmand-pri (lsb:gearmand): Started opservices-opmon-nodo01-pae
 opmon (lsb:opmon): Started opservices-opmon-nodo01-pae
 optraffic-pri (lsb:optrafficd): Started opservices-opmon-nodo01-pae
 Clone Set: OpmonExtraProcesses_Clone [OpmonExtraProcesses]
 Started: [ opservices-opmon-nodo01-pae ]
gearman-utils-pri (lsb:gearman-utils): Started opservices-opmon-nodo01-pae
- After that, remove the pacemaker process from boot on Node02, with the command bellow, don’t worry the process will be included again on boot after the reboot:
[root@opmon-nodo02 ~]# chkconfig pacemaker off
- Now with all process running on Node01, we will make the update on Node01, following those steps, to perform minor and major updates:
2 – Version Update on Node01 (minor)
Execute the following commands to make the update to the last version:
- This command execute a cache clean:
[root@opmon-nodo01]# yum clean all
- After that we execute this command to update all available packages:
[root@opmon-nodo01]# yum update -y
3 – Version Update on Node01 (major)
Before initiate this process,you need to have the OpMon License for the new version, if you don’t, problems could happen.
Follow these steps to make the major version update:
- This command make a cache clean:
[root@opmon-nodo01]# yum clean all
- The YUM0 variable defines the version value, in this example we are updating to major 8:
[root@opmon-nodo01]# export YUM0=8
- After that we execute the following command to update all packages:
[root@opmon-nodo01]# yum update -y
- Always when the server Uptime is higher then 180 days or if have a kernel update, you’ll need to reboot the server:
[root@opmon-nodo01]# reboot
3.1 – If necessary, apply the new license on Node01
Through the web interface, apply the license. To make that, select “Tools” and “License” like the image bellow:
Then, click in “Update License”:
And select the license and click in send:
4 – Repeat the process on Node02
Now that the Node01 are fully updated, rebooted and the web interface access is validated, it will be necessary repeat all process to the Node02.
After you have validated all update process on Node02, you can active the pacemaker process and include it on boot:
- After validate if the process are not running:
[root@opmon-nodo02 ~]# service pacemaker status
pacemakerd is stopped
- Active the pacemaker:
[root@opmon-nodo02 ~]# /etc/init.d/pacemaker start
 Waiting for shutdown of managed resources...... [ OK ]
 Signaling Pacemaker Cluster Manager to terminate [ OK ]
 Waiting for cluster services to unload.... [ OK ]
 Stopping cluster:
 Leaving fence domain... [ OK ]
 Stopping gfs_controld... [ OK ]
 Stopping dlm_controld... [ OK ]
 Stopping fenced... [ OK ]
 Stopping cman... [ OK ]
 Waiting for corosync to shutdown: [ OK ]
 Unloading kernel modules... [ OK ]
 Unmounting configfs... [ OK ]
- Insert the pacemaker on boot:
[root@opmon-nodo02 ~]# chkconfig pacemaker on
- And then, validate if all process are running correctly, like the example bellow:
Stack: cman
Current DC: opservices-opmon-nodo01-pae (version 1.1.15-5.el6-e174ec8) - partition with quorum
Last updated: Wed Jan 17 17:35:36 2018 Last change: Thu Jan 11 10:26:29 2018 by root via cibadmin on opservices-opmon-nodo01-pae

2 nodes and 15 resources configured

Online: [ opservices-opmon-nodo01-pae opservices-opmon-nodo02-pae ]

Active resources:

vip_nodo01 (ocf::heartbeat:IPaddr2): Started opservices-opmon-nodo01-pae
vip_nodo02 (ocf::heartbeat:IPaddr2): Started opservices-opmon-nodo01-pae
 Resource Group: opmonprocesses
 syncfiles (lsb:syncfiles): Started opservices-opmon-nodo01-pae
 gearmand-pri (lsb:gearmand): Started opservices-opmon-nodo01-pae
 opmon (lsb:opmon): Started opservices-opmon-nodo01-pae
 optraffic-pri (lsb:optrafficd): Started opservices-opmon-nodo01-pae
 Clone Set: OpmonExtraProcesses_Clone [OpmonExtraProcesses]
 Started: [ opservices-opmon-nodo01-pae opservices-opmon-nodo02-pae ]
gearman-utils-pri (lsb:gearman-utils): Started opservices-opmon-nodo01-pae
5 – Enable the notifications
- Active the notification globally accessing the menu “Tools/Configurations”. Choose the “Main Config/Restart Actions” option and check notifications as enable. Then click in Update.
6 – Executing the export and validating the configurations
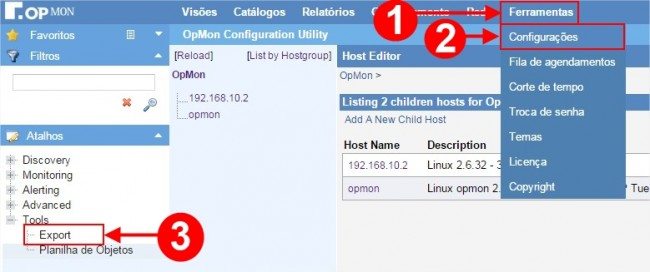
- To complete the update, perform a configuration export through Web interface. To make that, access the menu “Tools” then “Configurations” and click in “Export”:
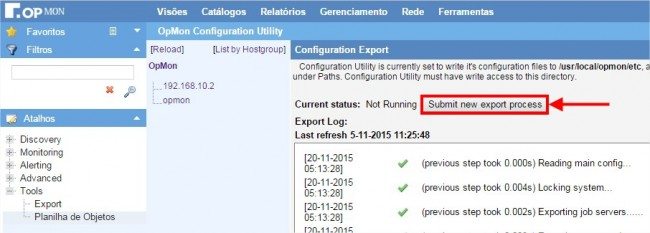
- Then click in “Submit new export process”:
Remember to clear your browser cache.
All Done! Now, you can use OpMon new features!


